Throwback Tuesday: Tilly Ramsay’s incredible Rainbow Cake recipe!
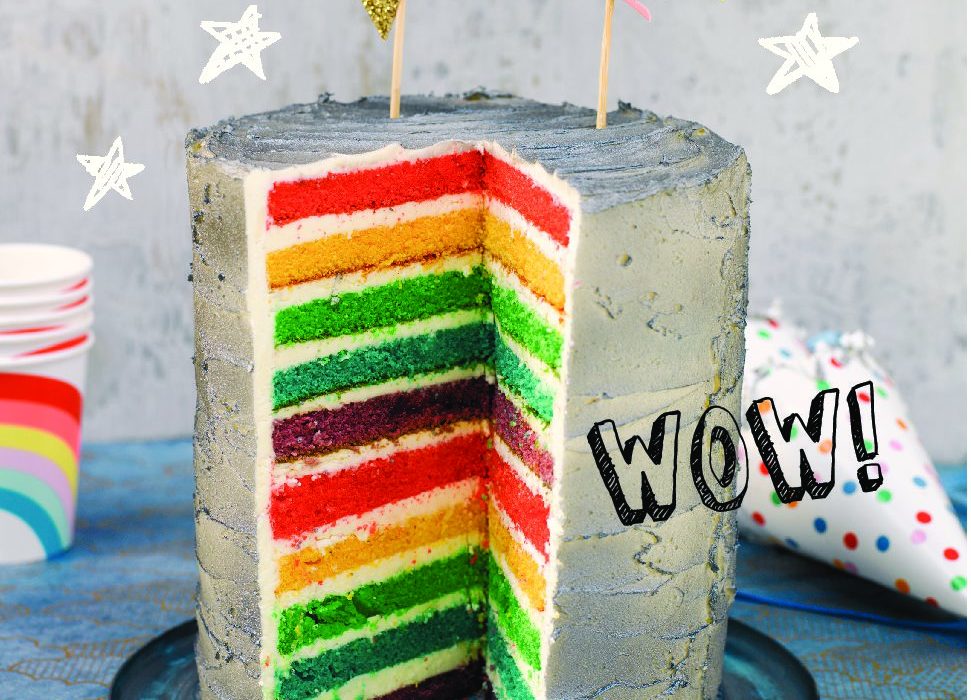

We’ve seen that Tilly Ramsay can cook up a storm on the Strictly dance floor, but she also has some serious skills baking in the kitchen! Today we are sharing her deliciously decadent rainbow cake recipe, that she made specially for her Mum and Dad’s 20th wedding anniversary just before the pandemic hit. You may worry that it requires a fair bit of effort, but trust us when we say, it’s totally worth it!
Tilly Ramsay’s Rainbow Cake recipe:
[You need to make 2 batches of the following so make sure to DOUBLE the ingredients!]

350g soft butter plus extra for greasing the pan
600g caster sugar
6 eggs
1 1/2 teaspoons of vanilla extract
1/2 tsp salt
1 tbsp baking powder
470g plain flour
340ml whole milk
5 different food colouring – red, yellow, green, blue and purple
Edible silver spray, to decorate
For the buttercream icing
800g softened butter
1.75kg icing sugar
2 tsp vanilla extract
2 tbsp milk if needed
Special Kit List

- You will need 6 bowls for this cake!
- One large one for the mix and 5 medium ones – one for each colour.
- 5 x 20 cm cake tins – no more than 5 cm high or they won’t all fit in the oven at the same time
- Stand mixer with a whisk attachment fitted.
- 5 baking paper circles to fit the bottom of the cake tins.
METHOD
- Heat your oven to 180/160 Degrees C fan/gas mark 4
- Put the butter into the bowl fitted with the whisk attachment and beat for about 5 minutes until its light and fluffy.
- Add the sugar and whisk until its all mixed in
- Then add the eggs 2 at a time waiting until each set of eggs is fully mixed in before adding the next 2.
- Next add the vanilla extract
- Using a fine metal sieve, sift the flour, salt and baking powder together and then add it to the sugar and butter mixture, a bit at a time, and whisk until it is incorporated. When you have added a third of the flour, add half the milk, then repeat until all the ingredients are in the mixing bowl.
- Use a rubber spatular to scape the sides of the bowl and mix one last time to ensure all the ingredients are fully mixed in. Scape this into your large mixing bowl.
- Repeat with second bath in a separate bowl.
- Combine the two batches of cake batter in a very large bowl so that all the cake mix is together, then divide the mixture between 5 medium bowls – use scales for this if you want to be exact.
- Add the different food colourings to the bowls a few drops at a time and mix them in so there are no streaks. Add more if you want more intense colours.
- Grease the bottom and sides of the 5 sandwich tins with butter and put a circle of baking paper on the bottom of each one.
- Pour a different coloured cake mix into each cake tin.
- Put the cake tins into the oven for 40 to 50 minutes. After 40 minutes, poke a skewer or toothpick into the centre of the cakes. If it comes out clean, the cakes are cooked but if not, return them to the oven for a little longer and check again in 5 minutes time.
- Remove the cakes from the oven and let them cool before carefully removing them from the tins. Wrap them in cling film and put them into the fridge or freezer to make sure they are completely cold before you trim and slice them.
- While the cakes are in the freezer, make the buttercream icing using the method below. Cover it with cling film until you need it.
- When the cakes are completely cold, use a serrated knife to carefully trim away the edges, tops and bottom, taking off small amounts at a time to remove the brown edges and reveal the colourful inside of the sponge cake.
- Cut the cakes in half horizontally to give you two cake sponges of each colour.
- Put a third of the butter icing into a separate bowl and re-cover the rest with cling film.
- Put a small dollop of icing on to a cake stand to stick the first layer of sponge to the bottom.
- Put one of the purple sponges on to the cake stand then start spreading icing onto the sponge, very thinly at first, to press crumbs in place – this layer of icing is called the crumb coat. Then add a bit more icing to create a butter cream layer between the sponges.
- Top this with one of the blue sponges and repeat with the crumb coat and icing layer.
- Top this with one of the green sponges and repeat with the crumb coat and icing layer.
- Top this with one of the yellow sponges and repeat with the crumb coat and icing layer.
- Top this with one of the red sponges and repeat with the crumb coat and icing layer.
- Then repeat all the layers again until the top final red layer. Cover the top with the crumb coat then cover the sides of the whole cake with crumb coat too.
- Put the cake into the fridge to set and chill for about 2 hours.
- Remove the cake from the fridge and use remaining icing to cover the entire cake, top and sides. Use a palette knife or spatula to make it as smooth as possible.
- Spray the whole cake with edible silver spray and serve to the delight and awe of everyone you know!
 Please wait while we create your listing....